Showing posts with label audi. Show all posts

Audi A4 Motorola Bluetooth Integration

,
There are many phones and many Bluetooth kits out there. This is only one option available - I dont profess this set-up to be the best, but it fits my needs.

Phone Model: Motorola v-505
Bluetooth Kit: Motorola 98500 / S9642C

Why Bluetooth? 2 main reasons:
1) Bluetooth functionality allows the phone to integrate with the phone functionality that is already wired into Audis without any wires. Meaning, I can now sit in my car and place calls by voice while the phone is remains in my pocket.

2) But more importantly, you are no longer tied down to the phone. One disadvantage of non-Bluetooth phone kits (such as the Nokia 8260s I had prior to this one) is that the hardware is specific to that particular phone. Therefore, I was stuck with the Nokia even as phones got advanced and had more features. So now if there is a new phone that comes out in the future with features I like, if it has Bluetooth, I just have to take a minute or 2 to configure it to talk to my bluetooth kit I installed in that car and Im in business. All the hardware I had from the Nokia kit is now useless.

Heres the kit and its contents:


Basically, I connect the kit to the car in the same manner as when I did the Nokia 8260 integration. With an additional DB25 straight-thru cable, you plug it into the cable coming out of car in the CD-Changer area (B5 A4) and cut the cable as shown here.


I really recommend this method - as there is no soldering required with this approach. More details on that in my Nokia 8260 article

Then connect the wires from the kit as diagrammed here:
PIN on DB25#: -----> LINE:
10 -----> Orange
16 -----> Red Isolate with fuse
5 -----> Green line Isolate with fuse
3 -----> Black
19 -----> Speaker + (white line)
25 -----> Speaker - (black line)
15 -----> Mike + (white line)
14 -----> Mike - (black line)
[The Yellow and Blue wires are not used]

You cut the speaker and microphone lines in the kit and connect them to the appropriate lines listed above.

I placed the Junction Box (the black box in the 1st pic) behind the dash and Control Unit on the dash console as shown here:


Its possible to place this elsewhere - by the handbrake area or to the left of the steering wheel. I considered both, but I preferred this. Somebody more creative than me will come up with something else Im sure.

The blue button on the Control Unit is the main Bluetooth button. When the ignition gets turned on, that button flashes until a connection is made with the phone. When the connection is made, the buttons remains lit and the phone is now in Bluetooth mode. Heres a pic of the phone getting connected to the kit - again, this can happen with the phone in my pocket. This is just for demonstrative purposes:


The circular button in the middle is the Mute button. When a call is established that lights up in orange. If you press it, the mic is muted and it flashes. When you want to resume, you press it again and you can speak again. The Button next to that is the Voice Recognition button. If you want to make a call, you press that button, the radio is muted and it displays "Phone" and a sexy British female voice says "Say a name" You then state a name you have programmed - "Linda" for instance. Then it says back "Calling " - and voila the call is made. The 2 buttons on the right are volume buttons...

Heres a night time shot:


It took me about an hour to install this because it basically sat on top of my old installation. But if doing this from scratch, it should take about 3 hrs.

Other cool things/features:
-If you want privacy, you simply press the Bluetooth button until it is unlit, then you can just use the handset as normal. You can do this even when youre on the phone.

-You can program a keyword to use when a call comes in. In my case I use "answer". When a call come in I say "answer" and the call is picked up.

-The kit supports 2 types of voice dialing, the phones and the kits own internal voice dialing. The kits has the voice prompts and has to be programmed/trained separately.

-When the battery level on the phone is running low, the Bluetooth feature gets disabled.

-You can configure a few other optional setting to fit your preferences - ringtone, auto-answer, etc.
Read more →

Audi A3 Trailer Light Wiring

,
In the rest of the world Audi provides plug-and-play wiring for trailer lighting. Since Audi doesnt offer a hitch for the A3 in North America, they dont offer wiring either. The European wiring kits are very expensive and dont correspond to US trailer wiring conventions, so importing one was not an option. (Click here for an article about my custom hitch.)

Since the A3 has a software-configurable variable-voltage lighting system for the taillights, and most models are equipped to detect failed bulbs, a solution had to be found that would work reliably, would not interfere with the cars diagnostics, and would avoid problems associated with how the A3 taillights work. I was able to do this using a trailer wiring converter that protects the cars circuitry and puts no load on the lighting circuits. When connected to the correct circuits (not the three tail/brake/rear fog bulbs on each side) it works perfectly, and if any taillight settings are changed (using VAG-COM, for example) it will not affect the trailer interface at all. The required converter is the Hopkins Manufacturing (Hoppy) 46365. To find one, search for Hopkins 46365 or Hoppy 46365 on Amazon, eBay or Google.

I have produced step-by-step instructions to guide you through installing the trailer lighting interface on the A3 in a problem-free manner. Its about a 1 to 1.5 hour job. These instructions are also useful for anyone wanting to open up the side panels in the cargo area and/or remove the subwoofer, since they contain details and photos on how to do so.

Click the image below to download the instructions as a PDF. The download file size is about 5MB. You will need Adobe Reader to view and print the instructions.
Read more →

Audi A3 2006 Audi A3 8P Concert II and Symphony II SAT Tuner Install

,

The following instructions are based on my personal experience and are in no way an official set of instructions. I provide no warranty whatsoever. If you use these instructions to install your own Audi satellite tuner, you do so at your own risk. I doubt Audi will cover any issues under warranty without charging you for the entire install. So, good luck.

These instructions are only tested for 2006 Audi A3 8P Concert II and Symphony II (BOSE) non-NAV

This process should work with either of the following SAT Tuners:

8E0 057 593A - XM
8E0 057 593 - Sirius

These tuners can be purchased at your local Audi dealer, eBAY or web vendors like http://www.clairparts.com/

This is a super ez mod consisting of the followoing steps that (according to Audis instructions) must be performed in this order:

  1. Install the tuner in the space provided on the left side of the boot area.(FIG 1)
    • lift plastic cover, there are 2 clip holes. A small screwdriver or a key will open easily. (Arrows in FIG 1)
    • Locate foam wrapped cable ends (FIG 2)
    • carefully clip zip ties from factory and unwrap the plug ends
    • remove bypass loop plug from CAN cable (FIG 3)
    • plug cables into sat tuner (FIG 4)
    • slide SAT tuner into the mounting bracket. Fit is very clean.
    • secure with 2 very small zip ties (FIG 5)
  2. Remove passenger side kick plate by door and connect CAN bus plugs
    • Carefully remove kickplate cover - Typical VAG plastic part with metal clips. Requires a firm tug in strategic places to remove w/o breaking anything. Take it slow and be careful. The plastic above the top clip needs some care to remove without stressing the plastic (FIG 6)
    • locate cables, they are wrapped to exisiting wiring bundles with masking tape
    • remove tape, plug CAN connectors together (FIG 7)
  3. Turn on car, press SAT button on stereo and tune to preview channel
    • Go to SAT vendor website and activate your SAT tuner, make sure unit is on and receiving signal when you do.

That was all I had to do!

You will notice no mention of VAGCOM, the official line from Audi, says you will have to use VAG COM, but I did not. I installed a Sirius tuner in a BOSE, SAT Ready, Non-Nav factory HU.

For your reference I am posting what I have been told needs to be done with VAG COM.

  1. Plug the CAN compliant VAG COM ito the A3 8P Dash port
  2. Select Option 56-RADIO
  3. Select Option 10-adaption
  4. Enter Channel number 99
  5. It will show -1- Slide bar to -0- Remember to Save Settings
  6. Display on VAG COMshould say that Value -0- was saved.
  7. Back out of the setting. Radio/SAT receiver should now operate.
  8. If you still see "No SAT Radio" when you hit the SAT button, you need to recheck the wiring. All CAN connections must be verified.

I plan to borrow a VAG COM to double check these settings, but I have been working 100% for a week without any VAg COM modifications.

Read more →

Audi A3 Proper Use Of An Instant Detailer

,
Ok, you’ve reached that point where your anal about car care. You’ve invested time and money on proper car care products. You’ve spent a day or two, here and there, getting your car looking its best, you’ve polished, and waxed or sealed, now how do you keep it looking like that throughout the week, until your next wash? Not long ago, instant detailers (id’s) came along. Mothers, and Meguiars were two of the first car care companies to introduce it, under names Showtime and Quick Detailer, respectively. These are both good products when used for light cleaning of the vehicles surface. You simply spray on the surface, and wipe clean with a soft cloth…..it can’t be that easy, or can it?

It can be! But with so many instant detailers out there, which one should you choose? You could choose from Meguiars, Mothers, Black Magic, Zymol, Eagle One, etc. These all have their place, somewhere in car care. I guess if I had to pick one of the above, I would go with either Eagle Ones, or Mothers version. They are both very good, and reliable. There are also a few products available online which in my opinion are exceptional products. Clearkote, Poorboys, Adam’s (brand new), are a few.

Lets get to basics with instant detailers, what can and can’t they do?
First off I want to make clear, that these products are not intended to replace normal washing routines. There simply designed to remove light grade contaminants from the vehicles surface, i.e. dust, fingerprints, and an occasional visit from a seagull, when you’re in a pinch (no pun intended). You should always carry at least a 4oz bottle of ID when you’re on the road for these types of emergencies.
ID’s are really great for maintaining that just washed/waxed look. Some can be used on windows (Clearkote Quikshine is even recommended for glass, matter of fact, the only thing you cant use it on is your tires). Some are difficult to get off if over sprayed on windows, so read directions on the back label.

There very easy to use, your basically going to use the same technique you do while drying your car. Spray a light mist on the surface (in shade preferably), wipe with microfiber polishing towel in the same direction as you remove your polishing and wax/sealant products (This will remove contaminants). Turn towel over, and buff to finish (This will create the shine).

Most products will have either a polymer, carnauba, or silicone content which will deter further dirt and or dust from accumulating. Truly a time saver and can really extend the life of sealant or wax currently protecting your car. Most “speed details” only cost from about $.30 to $.75 per job, so a real affordable alternative to the bucket and sponge! Just keep in mind, this is a between washes, product, not intended to replace the bucket and sheepskin wash mitt!
Read more →

Audi TT DIY R R Coolant Sensor Switch

,
The coolant sensor switch has been known to degrade slowly - it sends inaccurate signals to the ECM. The best part is that the R&R takes no expertise and its what I call a 5 n 5. It costs approximately $5 and it takes approximately 5 minutes to replace!!

The tech article on AW is a little out of date (and it is written, with diagrams, for a 99 A4). The sensor is found at different locations on the 1.8t and 2.7t engines; determine where your sensor is located before proceeding with the following instructions.

Its truly a very easy Remove & Replace, but Im going to go into every detail for the sake of safety. I will emphasize right now that there are two parts that you could damage or lose because they are small. They are the retaining clip and the O-ring that seals the sensor inside the sensors housing. If you go slowly and use your head, you wont have any problems with either of these parts.

YOU NEED TO DO THIS R&R WHEN THE ENGINE IS COOL.

First, you need to remove the wiring harness from the sensor. There is a pressure clip (that will release the harness) that is designed and operates just like many of the other wiring harnesses throughout the engine bay.

NOTE: Some people like to leave the harness on so they can use the harness and wire set to pull the entire unit out. Then they unclip the harness from the sensor once its out. Thats OK if you think you wont get leverage, BUT... when you pull on the unit, make sure you are NOT pulling on the wires only or you may damage the wires. (Its like when youre home vacuuming and then you yank on the vacuum cleaners electrical cord, rather than walking over to the outlet and pulling on the plug. WRONG!)

Next, you need to remove the PLASTIC horseshoe shaped retaining clip that secures the sensor in its housing. Pull it straight out - NOT UP, but parallel to the ground. Its plastic, so if you dont pull straight out, you might snap it - not good. It will have a little tension. Just pull firmly and it will give. PUT THE CLIP SOMEWHERE SAFE. Its too small and to vital to lose.

Now you need to pull the sensor out.

NOTE: The sensor is sealed in its housing by a small rubber o-ring. It may come up with the sensor or it may remain inside the housing. Regardless, dont lose it! Some people replace it with a new one while most re-use the old one because the o-rings rarely have damage.

Now just pull the sensor straight up and out. It will resist due to the o-ring, but it will suddenly come loose. Just get a good grip and pull firmly. At this point you may get splashed by a little coolant - dont worry about the coolant (unless you didnt heed my caution to do this on a cool engine!) - it only gets on your hand.

Now all you do is reverse the process for the installation of the new sensor. No need to replace the spilled coolant - its too little to worry about.

NOTE: If the sensor is not seated all the way into the housing, then you wont be able to replace the retaining clip properly - it wont snap into place. If there is a problem, its probably the o-ring. Check to see that the o-ring isnt kinking around the sensor.

Youre done and have saved yourself hundreds of potential repair dollars in just five minutes!!
Read more →

Audi A4 B5 Stratmosphere Shortshifter Install

,

Required tools:
1. 3/6mm allens (6mm allen should have an 8" reach)
2. Socket set with metric sockets, extension, ratchet 8mm and 10mm open end wrench.
3. Circlip Pliers
4. Torx25 driver
5. Loctite (although not a tool, also not supplied but HIGHLY recommended)
6. Shop towels to wipe your hands free of grease!
7. A friend is a valuable tool to assist you in the install, although not required
also highly recommended.


Step 1: is to remove the shift knob by turning the knob counter clockwise till
the knob is off. Then carefully lift up at the seem between the shifter assembly
cover and the center console as depicted by the red arrows.


Step:2 With a 10mm socket wrench, remove the 2 10mm nuts holding the foam padded
sound break.


Step 3: You will then see the core of your shifter assembly. Now with your 6mm
allen wrench remove the two bolts and the one metal plate that connected the
shifter linkage to the transmission linkage. They are loctited from factory
and so a standard allen wrench may not allow you to provide enough torque to
remove them. In this case, use a 6mm socket wrench adapter to remove these bolts.


Step 4: With the 2 6mm bolts removed, loosen the front 2 10mm nuts holding the
shifter "bucket". You do not need to remove these two nuts, just loosen.


Step 5:Completely remove the rear 2 10mm nuts. This will allow you to gain access
to the 4 torx bolts.


Step 6: CAREFULLY remove the 4 torx bolts (T25) that hold the shifter assembly
down. Be careful to not drop/lose one of the bolts between the shifter bucket
and the center console.


Step 7: Once you remove the 4 torx bolts, work the shifter linkage free from
the transmission linkage (bottom arm). Once thats done its easiest to get the
assembly out by pushing the top connection to the left as shown and pulling
the linkage out. It might take some work to get the assembly positioned to remove
it.


Step 8: With the shifter assembly out, take your circlip pliers and remove the
circlip that holds the linkage to the assembly.


Step 9: At the joint where the bottom linkage connects to the upper linkage,
remove the 10mm nut/bolt holding the linkage together. This will allow you to
remove the stock linkage from the assembly.


Step 10: Now remove the 2 rubber dampers from the flexible pivot cup, then
remove the pivot cup from the stock shifter linkage.


Step 11: Take the packet of silicon grease and liberally apply to the ball.
Install the flexible pivot cup to the Stratmosphere shifter linkage. Tie the
zip tie around the pivot cup. You should notice a decrease of slop/play in the
shifter. Do not over tighten.

Note: put the side with the notches facing upwards away from the bearings. Reassemble
the black dampers, the linkage should look like the following.


When replacing the circlip remember to place the metal spacer from the original assembly between the damper and the circlip.


Step 12: Assemble the lower portion of the linkage. Place one shim between the
bearing and the lower linkage on each side(3 were included, you only need 2)
Use a pen/small screwdriver to position the shim and secure with the provided
bolt and locknut. Tighten until the bolt does not spin freely, but do not over tighten.


The assembled linkage should look like the picture above. Note the position
of the lower linkage in relations to the shifter arm. The hole is facing the
bottom. This is crucial during reassembly.


Step 13: Now reassemble the shifter assembly into shifter bucket. Place one
of the 4 aluminum spacers under the ends of the 2 rails that hold the shifter
in place. Again be careful to not lose a spacer. Tighten down the 4 torx bolts
at this point.

Step 14: Reverse the disassembly process. First replace the two 10mm nuts at
the back, and tighten down the two in the front of the console. Now using the
unsupplied loctite you purchased, place a small amount on the thread of the
2 6mm bolts that connect the shifter linkage to the transmission linkage. This
is a very important step in preventing the bolts from vibrating loose
over time. Now position the shifter so that the bottom linkage is easily accessible,
reinstall the plate and the bolt. Do not completely tighten the bottom 6mm bolt,
you will adjust this later to ensure proper alignment of the assembly. Reinstall
the top 6mm bolt, again do not tighten completely. Now with both bolts partially
tightened, align the shifter in the position sliding it forward and back until
its sitting in the position you want it to be. Now tighten the two bolts (snug)
and reinstall your shift knob. With the engine OFF, test that you can
easily shift through each gear including reverse. Make sure that the distance
between shifting from neutral to third, and neutral to fourth is the same. If
you can engage all gears easily, and the bottom linkage doesnt come in contact
with the shifter bucket, tighten down the 2 6mm bolts completely. Now reinstall
the sound break, and the 2 10mm nuts that secure it. Carefully reinstall the
shifter cover/shift knob and take your car for a spin! Youre done! Now how
hard was that???? *DONT ANSWER THAT!* =)


Pictures used in this how-to are of Alans fingers and his gorgeous pearl white
A4.
Read more →

Audi A3 Black Paint Care 101

,
First off... NEVER wash your vehicle with the sun at high strength. Depending on where you are, this is usually the same hours that they say to wear sun protection. Best to wash around 8 AM or after 4PM.

Ok...now...your using your garden hose, correct?

Make sure you use a mist from your hose to get wet before washing... use a GOOD wash... spend the 10 bucks on a bottle of suds... such as Meguiars or anything similar.

Use a good mitt that is clean and rinsed to wash your vehicle by hand. Always the black paint first, then everything else later like the tires, bumpers... etc and above all... start from the top of the vehicle first.

Rinse... you dont want to spray or mist... NEVER do this... these are all your water spots aided by heavy calcium deposits as well.

You want to take the sprayer off your hose if you had one on, and just let the heavy pour of the water from the hose run off the paint. Carry the end of the hose over where you are rinsing and because a heavy pour of water is more prone to being pulled down by gravity, the water will just carry off your vehicle... hence, less water spots and less time to dry.

Now... many have said use a chamois or other type of cloth... I dont recommend these. Purely because they are only good at getting the water off... yet, they often carry off the wax and/or oils in the paint and over time... more swirls and more slight scratches are possible.

Use a drying blade... often found in all auto stores, these are cheap and they look like those things you use to wipe your windows off.... these blades are so soft and they just whisk the water off your vehicle and leaves everything else intact. If your really obsessed about drying, get a blower and blow the water out of your cracks and door jams.

Your towel supply should be what is called "microfiber"... and this is a word being tossed all over the net right now, but believe it or not, they are much better at removing and trapping any dust than a terry or cotton cloth. Remember, we are also trying to avoid swirls here. Microfiber towels can be found all over the net and also at bigger auto stores like Pep Boys.

Now for the detail part -

Much debate goes on and on about the "best shine" or what works best for all vehicles. We are focusing on BLACK paint here and through trials of ALL formulas... this is the best:

Klasse All-In-One Polish and Shine... and it comes in a red bottle... can be found anywhere ONLINE and many detail stores... but this is the best for black.

You want to make sure that your paint is cool to touch also.

I always recommend by hand... if you get into orbitals... they are best for vehicles that already have the swirls, and this could apply more to you. Make sure you have a microfiber bonnet on your orbital if using one... we are keeping it SMOOTH here. Using a pad, (I will just say hand from now on, if you have the orbital, which you do, just know that you can use it the same but DONT apply pressure and you will still have to use by hand after you are done to get the places the orbital couldnt get into), apply slight pressure and work one part of the vehicle at once. Make sure you use LITTLE of the Klasse... through all tests of major detailers that use Klasse... it lasts about 5 years even on a TRUCK!

After you have done the whole vehicle... buff it off... again, a microfiber is best and make sure you have about 4 of these for the whole project. The polishing and buffing you just did will remove ALL the swirls and not just cover them up.

Now follow with Klasse Glaze... which is in a gray bottle. SO SIMPLE to use... but most effective in getting your best shine on your black paint. With another pad, you simply wipe a little of the glaze over your paint and here with your hand, you apply NO pressure... because this is not a polish... it is simply a glaze that enhances your clear coat by filling in all the pores and microscopic caverns that effect how light is reflected off your paint.

Note: Many detailers including myself, recommend using a Spray Detailer that you use between washes to remove light dust. Mist the pads you use BEFORE applying the Polish and doing your vehicle and the Glaze before doing the vehicle... this allows the pad to more evenly distribute the product and not use it over excessively like we tend to do!

Here is the trick of your shine... If you want the best shine possible, the LONGER you leave the glaze on, the better the effect will take place. Amazing huh? Well, this is a process that we are going for a KILLER WET shine visual here. But the minimum also is 1 hour after it is on... so choose what you like... then buff it off.

With Klasse Glaze, it is possible to use several coats after to continue to enhance the shine... and this is not a phrase made up... this is actually very true.... if you buffed the glaze after an hour, then you have to WAIT 4 hours for the glaze to cure before applying another coat. If you waited over night and buffed the glaze in the morning, then you can buff off the glaze and then immediately reapply another coat of glaze.

Above is the best piece of advice from how people get their vehicles at shows to look SO rich.

The glaze is your best tool. Remember, the more coats, the better the effect but remember the times in-between to making it work. In addition, Klasse Glaze can be applied to all the taillights, headlights, foglights as well... just make sure you rub it off after its left on for a little.

Now dont mistake me here... because many will read through this and think. DAMN... thats a lot of work! Well, not when you do it right the first time. This is a method that will allow you to keep the shine for up to 10 to 12 months typically... and can go longer if you glaze your vehicle every 2 weeks or so.

Now... after the glazing...

Use a good wax... Meguairs is recommended again.

This seals in your perfection... and if you wash your vehicle ONCE a week, which is recommended, follow with a wax.

Again, USE MICROFIBER towels and pads... they are the best and you will love how these towels suck up the white dust left from chemicals and wax.

You can use a Spray detailer like Eagle One or Black Magic to keep the dust off during the week and take off with a clean microfiber towel (keep a bottle and a few towels in your vehicle).

And always, if you have the time. GLAZE your ride every 2 weeks or 4 weeks and follow with a wax.

AND ABOVE ALL - NEVER use dirty towels or cheap terrycloth towels on DARK PAINT!

Then after following all this, you will NOT have swirls and your BLACK paint will be ultra buttery smooth and wet for the 10-12 months I said at which time you will need to REPEAT from the top.

Now... all of you who read this... it works best on RED also... or any DARK Color. All other colors will benefit as well... enjoy a swirl free buttery smooth wet world!
Read more →

Audi A3 DIY Stealth Valentine One V1 Concealed Display Hardwire Install BWW

,
Heres my version of the V1 Stealth Hardwire.

1. Remove rear view mirror and notch out black portion.

2. Run wire in the headliner and down the pillar. Ziptie for good measure.

3. Run wire from fuse box area to drivers DIS. I removed the vent to make it easier.

4. Wire V1 to fuse box.

5. Notch out cover.

6. Rewire concealed display to have the phone jack coming out the back.

7. Reinstall and clean up. Happy motoring.

Read more →

Audi A8 Scanner Hardwiring

,
I purchsed a Uniden BearCat Scanner, and hardwired it into the A4. The Install was pretty simple, and this method can also be used to install any electronic that you dont want taking up your cigarette lighter socket.

Supplies...

Soldering Iron
Solder
Fuse (AMP rating is up to you to decide on which one to use)
Hardwire kit (If your electronic comes with one...)
Multimeter
Fuse Tap


Supplies used, as mentioned above... (Minus the Fluke Multimeter)


20 AMP fuse, and Fuse Tap, purchased from NAPA auto supplies...


Simply place the fuse tap over the fuse, on the right side, when the fuse is upright. Then, solder your 12V lead to the end of the fuse tap. Its now ready to be plugged back into the fuse box.


Fuse box, showing the installed 20 AMP fuse, with hot lead soldered to the fuse tap, and the negative ground attached to the bolt.


The finished product, the Uniden BC Scanner fits like a glove in the lower owners manual holder. No need to mount anything, it just slides in, and is very snug...


Owners manual, for a 2002 B6, showing the fuse socket I used. I decided to go with the 20 AMP Fuel Pump socket, because its turned on and off with the ignition. This way, I can leave the scanner in the on position, but not have to worry about it draining my battery down when I shut the car off.
Read more →

Audi A3 Hexomat Cargo Liner

,
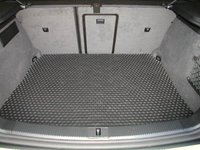
Got my Hexomat cargo liner today!

Heres the cargo mat situation for the A3 Sportbacks in the US: In Europe, there is apparently a structural difference in the rear cargo area floorpan between the front-wheel-drive and Quattro versions of the A3 Sportback. In the US, all of our A3s (Quattro or FWD) have the same cargo area shape and floorpan as the Quattro models do in Europe. So, when Audi originally brought in cargo area liners, they were the wrong ones and didnt fit properly. (This seems to have been corrected now - the original (wrong) part number ended with 180, the new (correct) part number should end with 181.)

While this was being straightened out, I looked around for other options. One concern with a liner that has a lip around the edge to trap spills is that the lip obstructs the cargo net attachment hooks. Ive been happy with Weathertech products in the past, but they dont make a cargo liner for the A3 yet.

What I did find was the Hexomat products from AutoSportCatalog.com They have both floormats and cargo liners in black, grey and tan. I was afraid that they had made the same mistake that Audi did, but they were nice enough to send me paper templates of the mats to check sizing before I ordered. The templates were the correct shape, so I ordered a cargo liner. I did not order floormats because they are exactly the same shape as the original carpeted mats that came with the car. This may appeal to some people, but I think that the drivers mat is too short and needs to reach up beind the pedals to trap the maximum amount of dirt, and the passengers mat really needs to cover the wheel well (the Audi Euro rubber mats do exactly that, which is what Im going to get for the floormats).

The Hexomat products have deep dimples over the whole surface of the mat instead of a lip around the edge. The advantage of this is that spills are more likely to be trapped near where they occur rather than spreading around the whole mat.

The Hexomat cargo liner arrived today. Im happy with it. It needed to settle a bit to flatten out after being rolled up in the shipping box, but I helped it out by rolling it the opposite way for a bit. It also didnt fit exactly right in a couple of spots, but removing about a millimetre of rubber with a razor blade solved that, and Im making the company aware of what they need to do. Its a very heavy grade material, and seems like it will be even more durable than my old Weathertech one was.

Black is definitely the right colour - I think the grey is a bit too milky to match well with the rest of the cargo area.


Read more →

Audi TT A4 1 8Tq Clutch Replacement

,

DISCLAIMER: This information is presented merely as a guide. Due to changes from year-to-year and options-to-options it may not be totally accurate. I can not be held responsible for anything that happens as a result of using this guide.

This is not something that should be attempted by someone who has never worked on a car, or has little experience with them.

If you use this guide, I only ask two things:
1. Accept the disclaimer,
2. Provide Feedback - comments/tips/problems/differences.

There, now that thats out of the way, lets begin.

Tools needed

  • Jack
  • Jackstands
  • Transmission jack - I borrowed mine from my uncle, its from Sears, and has an angle adjuster and strap to keep the trans on the jack.
  • Impact wrench
  • 6mm allen socket
  • 7mm allen socket
  • 8mm allen socket
  • 6mm allen wrench
  • 8mm allen wrench
  • 10mm socket (3/8" drive)
  • 13mm socket (3/8" drive)
  • 15mm shallow socket (3/8" drive)
  • 15mm deep socket (3/8" drive)
  • 15mm wrench
  • 15mm "shorty" wrench
  • 16mm shallow socket (3/8" drive)
  • 16mm deep socket (3/8" drive)
  • 16mm wrench
  • 16mm "shorty" wrench
  • 17mm shallow socket (3/8" drive)
  • 17mm deep socket (3/8" drive)
  • 17mm impact socket (1/2" drive)
  • 17mm wrench
  • 17mm "shorty" wrench
  • 18mm wrench
  • 22mm wrench
  • 3/8" drive ratchet
  • 12" extension w/swivel end
  • 6" extension
  • 3" extension
  • screwdriver
  • phillips screwdriver
  • Torque wrench
  • Plug for coolant hose (I used a 3/8" bolt)
  • 6 point T40 Torx bit
  • 12 point T40 Torx bit - special tool???
  • Loc-Tite
  • Patience
  • Common Sense
  • fan (gotta keep cool, right?)

If youre planning on changing the trans fluid, there are some special tools required. On my car it required a 17mm allen wrench (fill plug) and "3357 triple square socket" (drain plug) I bought the 3357 from http://www.zelenda.com and made the allen from a 17mm bolt welded to an old 1/2" drive socket.

I, of course, had these sitting in my toolbox, in the back of my car, 180 miles away :( So I made a new fill plug remover by welding a nut to bolt, and using a wrench on the nut, which turned the bolt, which turned the fill plug. I then picked the trans up and drained it through the fill plug. I used Redline MTL (75w90) fluid, it takes 2.9 quarts.

If you do change the fluid, do it after youre done. Wouldnt want to take the chance of spilling fluid in the area you will be working in/on for the next several hours.

Parts

  • Flywheel
  • Clutch
  • Pressure plate
  • Flywheel bolts (shorter than stock bolts)
  • Pressure plate bolts (same as stock bolts)
  • Throwout bearing
  • Clutch alignment tool - not necessary, but helpful
  • Driveaxle or driveshaft bolts - in case you muck up the ones you have.
  • New lock-nuts for the turbo - Bentley manual says to replace them, I didnt
  • New drive axle and driveshaft seals - Bentley manual says to replace them, I didnt

Instructions - Removal

I am following the Bentley manual for the most part. There are some steps I skipped, some that need to be added, and others that can be done differently. Im posting the steps and providing more info with them. If you are attempting this, you should have this manual already. It contains many other things, especially the required torque values for the bolts.

1. Disconnect ground cable from battery - 10mm
2. Remove driveshaft - ignore this step, its not necessary
3. Remove airbox - see pic
- Disconnect MAF connector
- Disconnect Power Output Stage connectors (see pic - 1)
- Disconnect Solenoid Valve for Wastegate Bypass Regulator Valve connector (see pic - 2)
- Disconnect EVAP canister purge regulator valve connector (see pic - 3)
- Disconnect hoses
- Pull airbox out

My car has a custom cone air setup, which is why the POS is mounted on aluminum and bolted to the fender.

4. Remove coolant tank and set aside
- remove three screws from top (phillips)
- Lift up and disconnect sensor from bottom (careful)
- remove top coolant line and plug.
- Leaving the bottom hose (big hose) connected, rotate the tank around about 135 degrees and lay it down

Coolant tank sitting position and O2 sensor connectors.

5. Disconnect second O2 sensor connector from under the coolant tank (leftmost connector - see pic) and free the wiring from any ties.
6. Remove O2 sensors. The manual does not say to do this, but I did it. Trying to remove the cat is difficult enough without having to worry about breaking the O2 sensors too. Takes a 22mm wrench and a little elbow grease. Youll probably have to track down the connector for the primary O2 sensor, or you might possibly twist the wires enough to break them (mine didnt break, but the jacket/insulator on one wire opened up.)
7. Remove nuts from cat-to-turbo connection. Three 17mm nuts. The shorty wrench will come in handy for the bottom nut.

The nuts and O2 sensor have been removed

8. Remove trans-to-engine bolts that you can get to from above. I think there were three accessible from above (left, middle, and right) 16mm.
9. Remove engine pan/cover from underneath - 10 screws: 3 front, 3 back, 2 in each wheel well.
10. Remove bracket for engine pan/cover - 2 bolts (13mm I think)
11. Jack car up and put on jack stands. Im not really sure of a good place to put the jackstands, I now have two slight dents in the floorboard of my car.

Car up in the air. Possibly bad spot for jack stands.

12. Remove heatshield from passenger side drive axle. Three 6mm allen bolts, two accessible with an allen socket (left and right) and the top bolt requires an allen wrench.
13. With the car supported on jack stands, place slight pressure on the trans with a jack.
14. Unbolt passenger side mount/support (leave mount connected to support) - two 13mm bolts, and three 8mm, again, two accessible with an allen socket (left and right) and the top bolt requires an allen wrench. Also remove the spring mount from the downpipe. You can let the jack pressure off the trans now, it will be fine without.
15. Loosen clamping sleeve on downpipe-to-exhaust connection. Youre supposed to be able to slide the clamping sleeves forward, but I couldnt get it to budge, and ended up pulling the downpipe out of it instead.
16. Remove the cat/downpipe by pulling it out from under the car. I made the mistake of trying to get it out from the top. I did finally get it with a lot of swearing and fidgeting. Oh well.

Catalytic converter and downpipe

17. Remove RPM sensor from transmission. My car did not have this. If it did, it would be located on the drivers side of the transmission, above the flywheel (about the two oclock position if looking at the front of the trans).
18. Now the fun part (1st of many) Disconnect the driveaxles. The shafts are bolted in with six 12 point torx-head bolts. I was able to use a regular 6point T-40 torx bit to remove them, but I highly recommend trying to get the 12 point bit to reduce the chance of rounding one of these things off.
19. Disconnect Speed sensor and reverse light connectors on drivers side of the trans. Make sure no other connectors are attached.
20. Remove starter, two 16mm bolts and one 6mm allen bolt. The wires can stay connected. This can be done one of two ways: The long and painful way, or the short and painful way.
- Long way: Remove bumper, remove A/C belt, remove A/C pump, remove starter.
- Short way: Attempt to get at 6mm allen bolt with an allen wrench by maneuvering your hand and arm through the A/C lines. When finally out (wait until you have to put it back in) remove the two starter bolts, slide the starter forward and attempt to lay it aside somehow.
21. Disconnect shift rod, one 10mm bolt
22. Disconnect shift pivot rod - one 8mm (may have been 6mm, not sure) allen bolt. Space is tight requiring the use of an allen wrench. When its out to the point that the allen wrench hits the trans tunnel, remove the allen wrench and try turning the bolt or washer on the backside with your fingers.
23. Remove the heat shield for the driveshaft. My car did not have this.
24. Remove the driveshaft from the trans - six T-40 Torx bits, let it hang on the heat shield.
25. Remove the four engine-to-trans bolts on the bottom (all 16mm), and there should be just two left holding it together afterwards.
26. Place transmission jack under the trans and put pressure on it.
27. Remove drivers side trans mount-to-support bolt (8mm allen bolt), leave the support bolted to the trans.
28. Remove the last two engine-to-trans bolts.
29. slide trans and trans jack back just enough for the bell housing to clear the pressure plate.
30. Lower trans just enough to get access to the clutch slave cylinder. While lowering the trans, DO NOT LET THE INPUT SHAFT HIT THE PRESSURE PLATE "FINGERS" The clutch cylinder is held in with a 6mm allen bolt, and will take a little bit of wiggling to get it out. Careful, its made of plastic. Do NOT remove the line, and do NOT press the clutch pedal.
31. Make sure all drive axles are clear of the trans and lower it. You might have to pull the trans off the jack to slide/drag it out from under the car, or you can just leave it under the car, and slide it out of the way.

Empty trans tunnel.


Parts removed


1 - Passenger side trans mount and related bolts
2 - Exhaust clamp bolts
3 - Passenger side drive axle shield and related bolts
4 - Starter Bolts
5 - Engine-to-Trans bolts
6 - Turbo-to-downpipe nuts
7 - Exhaust hanger spring
8 - Driveshaft bolts
9 - Clutch slave cylinder bolt
10 - Driver side trans support-to-mount bolt
11 - Drive axle bolts
12 - Coolant tank screws
13 - Just a rag, ignore it :)

Removing the clutch/flywheel

1. Remove the six 6mm allen head bolts from the pressure plate and remove it and the clutch plate. A screwdriver might be needed to gently pry it off. Careful, the pressure plate is the only thing holding the clutch plate in, and it WILL fall if youre not paying attention.
2. Bust out the impact wrench to loosen the six 17mm flywheel bolts. You probably dont need the impact, but you will spend a very long time trying to get the bolts loose without one.


Installing the clutch/flywheel

1. Look at the flywheel and youll notice the bolt holes are irregular. The flywheel only goes on one way. when you have all 6 bolts in, torque them down. I held a screwdriver between a flywheel tooth and the block while tightening. The manual calls for 44 ft lbs + 90 degrees. The shorter bolts for the new flywheel probably dont require the 90 degree turn. Check with APR to be sure.
2. Put the clutch disk and pressure plate on, the clutch disk has to go in a certain way (the taller middle side goes towards the pressure plate) Start putting the bolts in, but dont tighten yet. You need to center the clutch disk in the pressure plate. I eyeballed it since I didnt have the alignment tool. Torque the bolts in stages in a triangular fashion when its centered.

Time it took me to get this far, about 7 hours.

Take a break, the hardest part is about to begin.....

1. With the transmission on the transjack (if it has an angle adjuster, make sure its on the correct side), slowly lift it into place, making sure that nothing is in its way. You will need to match the angle of the engine with the angle of the jack. You will have to slide the trans in a little, jack it up, slide it in, jack it up, etc until the trans is aligned withe the engine. It may help to have a greater angle on the trans, and when its lined up, equal the angles out. DO NOT LET THE INPUT SHAFT HIT THE PRESSURE PLATE FINGERS. If one of them bends, bad things happen.

Jack on transjack - notice the the dents from the jackstands.

2. Put the clutch slave cylinder back on. Trust me on this one, do it now, before the trans is connected.
3. Now the fun part, inserting the trans. Mine slid right in, but if it doesnt, remember patience is the key. Put the trans in gear and try rotating the driveshaft end. this rotates the input shaft, and may help align it. If all else fails, pull the trans out (careful if the slave cylinder is bolted on), and check to make sure the clutch is still centered.
4. The trans probably wont slide all the way in. Get it in enough to get a bolt started on either side (start with the bolts that go through the guide pins.
5. Basically, everything else is the opposite of removal, just a little more difficult.

Reassembly time, about 8 hours.

Things to avoid (aka what I did wrong)

1. Remove the cat/downpipe from the bottom. It will come out from the top with a lot of struggling, yanking, and cursing, or it will drop right out the bottom with slight maneuvering.
2. when putting the transmission in, I got the shifter pivot arm caught between the trans and the hull, and bent it straight. I found this out after I had everything in, and realized I couldnt shift into 1st, 3rd, or 5th. The shift rod wouldnt come back far enough because it hit the shifter pivot arm. A jack and a 2ft long 2x4 promptly bent the arm back into shape :)
3. I tried to put the clutch slave cylinder on after the trans was installed. I could not get it to compress enough to install. I had to crack open the bleed screw and then push it in (I had a hose and container hooked up to catch the fluid), and then bled the clutch system afterwards (not a big deal though)
4. My APR flywheel/clutch was used and didnt have any bolts with it. I had to cut 5/8" off the end of the flywheel bolts in order to use them.

Notes/Comments/Suggestions:

Plan on a weekend for this job. Start Friday night, and if all goes well, you should be done Saturday night, or Sunday morning.

I started Thursday night about 10pm, worked until the trans was out at 4am. I started again Friday night about 9pm, worked until 4am and finished up a couple little things Saturday afternoon.

I should also say that my clutch and center Torsion were replaced about 10 months ago (25K miles) so I didnt have any stubborn bolts.

You might want to start by trying to bust the driveaxle and driveshaft bolts loose first. These will probably be the toughest bolts to get out. If you cant get them out, theres no sense in continuing, and it would suck to have to put everything back together

Some tips in case of a stubborn torx bolt:

1. hit it with a hammer a couple times
2. If it rounds off inside, try pounding an allen bit into it.
3. You could try grinding a slot in it, and using a screwdriver.
4. Try Vise Grips
5. Youll notice that there is a connector between pairs of bolts. If its the right bolt of the pair, you can use this connector as a lever (assuming the left bolt is out of course)
Read more →