Showing posts with label a3. Show all posts

Audi A3 Trailer Light Wiring

,
In the rest of the world Audi provides plug-and-play wiring for trailer lighting. Since Audi doesnt offer a hitch for the A3 in North America, they dont offer wiring either. The European wiring kits are very expensive and dont correspond to US trailer wiring conventions, so importing one was not an option. (Click here for an article about my custom hitch.)

Since the A3 has a software-configurable variable-voltage lighting system for the taillights, and most models are equipped to detect failed bulbs, a solution had to be found that would work reliably, would not interfere with the cars diagnostics, and would avoid problems associated with how the A3 taillights work. I was able to do this using a trailer wiring converter that protects the cars circuitry and puts no load on the lighting circuits. When connected to the correct circuits (not the three tail/brake/rear fog bulbs on each side) it works perfectly, and if any taillight settings are changed (using VAG-COM, for example) it will not affect the trailer interface at all. The required converter is the Hopkins Manufacturing (Hoppy) 46365. To find one, search for Hopkins 46365 or Hoppy 46365 on Amazon, eBay or Google.

I have produced step-by-step instructions to guide you through installing the trailer lighting interface on the A3 in a problem-free manner. Its about a 1 to 1.5 hour job. These instructions are also useful for anyone wanting to open up the side panels in the cargo area and/or remove the subwoofer, since they contain details and photos on how to do so.

Click the image below to download the instructions as a PDF. The download file size is about 5MB. You will need Adobe Reader to view and print the instructions.
Read more →

Audi A3 2006 Audi A3 8P Concert II and Symphony II SAT Tuner Install

,

The following instructions are based on my personal experience and are in no way an official set of instructions. I provide no warranty whatsoever. If you use these instructions to install your own Audi satellite tuner, you do so at your own risk. I doubt Audi will cover any issues under warranty without charging you for the entire install. So, good luck.

These instructions are only tested for 2006 Audi A3 8P Concert II and Symphony II (BOSE) non-NAV

This process should work with either of the following SAT Tuners:

8E0 057 593A - XM
8E0 057 593 - Sirius

These tuners can be purchased at your local Audi dealer, eBAY or web vendors like http://www.clairparts.com/

This is a super ez mod consisting of the followoing steps that (according to Audis instructions) must be performed in this order:

  1. Install the tuner in the space provided on the left side of the boot area.(FIG 1)
    • lift plastic cover, there are 2 clip holes. A small screwdriver or a key will open easily. (Arrows in FIG 1)
    • Locate foam wrapped cable ends (FIG 2)
    • carefully clip zip ties from factory and unwrap the plug ends
    • remove bypass loop plug from CAN cable (FIG 3)
    • plug cables into sat tuner (FIG 4)
    • slide SAT tuner into the mounting bracket. Fit is very clean.
    • secure with 2 very small zip ties (FIG 5)
  2. Remove passenger side kick plate by door and connect CAN bus plugs
    • Carefully remove kickplate cover - Typical VAG plastic part with metal clips. Requires a firm tug in strategic places to remove w/o breaking anything. Take it slow and be careful. The plastic above the top clip needs some care to remove without stressing the plastic (FIG 6)
    • locate cables, they are wrapped to exisiting wiring bundles with masking tape
    • remove tape, plug CAN connectors together (FIG 7)
  3. Turn on car, press SAT button on stereo and tune to preview channel
    • Go to SAT vendor website and activate your SAT tuner, make sure unit is on and receiving signal when you do.

That was all I had to do!

You will notice no mention of VAGCOM, the official line from Audi, says you will have to use VAG COM, but I did not. I installed a Sirius tuner in a BOSE, SAT Ready, Non-Nav factory HU.

For your reference I am posting what I have been told needs to be done with VAG COM.

  1. Plug the CAN compliant VAG COM ito the A3 8P Dash port
  2. Select Option 56-RADIO
  3. Select Option 10-adaption
  4. Enter Channel number 99
  5. It will show -1- Slide bar to -0- Remember to Save Settings
  6. Display on VAG COMshould say that Value -0- was saved.
  7. Back out of the setting. Radio/SAT receiver should now operate.
  8. If you still see "No SAT Radio" when you hit the SAT button, you need to recheck the wiring. All CAN connections must be verified.

I plan to borrow a VAG COM to double check these settings, but I have been working 100% for a week without any VAg COM modifications.

Read more →

Audi A3 Proper Use Of An Instant Detailer

,
Ok, you’ve reached that point where your anal about car care. You’ve invested time and money on proper car care products. You’ve spent a day or two, here and there, getting your car looking its best, you’ve polished, and waxed or sealed, now how do you keep it looking like that throughout the week, until your next wash? Not long ago, instant detailers (id’s) came along. Mothers, and Meguiars were two of the first car care companies to introduce it, under names Showtime and Quick Detailer, respectively. These are both good products when used for light cleaning of the vehicles surface. You simply spray on the surface, and wipe clean with a soft cloth…..it can’t be that easy, or can it?

It can be! But with so many instant detailers out there, which one should you choose? You could choose from Meguiars, Mothers, Black Magic, Zymol, Eagle One, etc. These all have their place, somewhere in car care. I guess if I had to pick one of the above, I would go with either Eagle Ones, or Mothers version. They are both very good, and reliable. There are also a few products available online which in my opinion are exceptional products. Clearkote, Poorboys, Adam’s (brand new), are a few.

Lets get to basics with instant detailers, what can and can’t they do?
First off I want to make clear, that these products are not intended to replace normal washing routines. There simply designed to remove light grade contaminants from the vehicles surface, i.e. dust, fingerprints, and an occasional visit from a seagull, when you’re in a pinch (no pun intended). You should always carry at least a 4oz bottle of ID when you’re on the road for these types of emergencies.
ID’s are really great for maintaining that just washed/waxed look. Some can be used on windows (Clearkote Quikshine is even recommended for glass, matter of fact, the only thing you cant use it on is your tires). Some are difficult to get off if over sprayed on windows, so read directions on the back label.

There very easy to use, your basically going to use the same technique you do while drying your car. Spray a light mist on the surface (in shade preferably), wipe with microfiber polishing towel in the same direction as you remove your polishing and wax/sealant products (This will remove contaminants). Turn towel over, and buff to finish (This will create the shine).

Most products will have either a polymer, carnauba, or silicone content which will deter further dirt and or dust from accumulating. Truly a time saver and can really extend the life of sealant or wax currently protecting your car. Most “speed details” only cost from about $.30 to $.75 per job, so a real affordable alternative to the bucket and sponge! Just keep in mind, this is a between washes, product, not intended to replace the bucket and sheepskin wash mitt!
Read more →

Audi A3 Black Paint Care 101

,
First off... NEVER wash your vehicle with the sun at high strength. Depending on where you are, this is usually the same hours that they say to wear sun protection. Best to wash around 8 AM or after 4PM.

Ok...now...your using your garden hose, correct?

Make sure you use a mist from your hose to get wet before washing... use a GOOD wash... spend the 10 bucks on a bottle of suds... such as Meguiars or anything similar.

Use a good mitt that is clean and rinsed to wash your vehicle by hand. Always the black paint first, then everything else later like the tires, bumpers... etc and above all... start from the top of the vehicle first.

Rinse... you dont want to spray or mist... NEVER do this... these are all your water spots aided by heavy calcium deposits as well.

You want to take the sprayer off your hose if you had one on, and just let the heavy pour of the water from the hose run off the paint. Carry the end of the hose over where you are rinsing and because a heavy pour of water is more prone to being pulled down by gravity, the water will just carry off your vehicle... hence, less water spots and less time to dry.

Now... many have said use a chamois or other type of cloth... I dont recommend these. Purely because they are only good at getting the water off... yet, they often carry off the wax and/or oils in the paint and over time... more swirls and more slight scratches are possible.

Use a drying blade... often found in all auto stores, these are cheap and they look like those things you use to wipe your windows off.... these blades are so soft and they just whisk the water off your vehicle and leaves everything else intact. If your really obsessed about drying, get a blower and blow the water out of your cracks and door jams.

Your towel supply should be what is called "microfiber"... and this is a word being tossed all over the net right now, but believe it or not, they are much better at removing and trapping any dust than a terry or cotton cloth. Remember, we are also trying to avoid swirls here. Microfiber towels can be found all over the net and also at bigger auto stores like Pep Boys.

Now for the detail part -

Much debate goes on and on about the "best shine" or what works best for all vehicles. We are focusing on BLACK paint here and through trials of ALL formulas... this is the best:

Klasse All-In-One Polish and Shine... and it comes in a red bottle... can be found anywhere ONLINE and many detail stores... but this is the best for black.

You want to make sure that your paint is cool to touch also.

I always recommend by hand... if you get into orbitals... they are best for vehicles that already have the swirls, and this could apply more to you. Make sure you have a microfiber bonnet on your orbital if using one... we are keeping it SMOOTH here. Using a pad, (I will just say hand from now on, if you have the orbital, which you do, just know that you can use it the same but DONT apply pressure and you will still have to use by hand after you are done to get the places the orbital couldnt get into), apply slight pressure and work one part of the vehicle at once. Make sure you use LITTLE of the Klasse... through all tests of major detailers that use Klasse... it lasts about 5 years even on a TRUCK!

After you have done the whole vehicle... buff it off... again, a microfiber is best and make sure you have about 4 of these for the whole project. The polishing and buffing you just did will remove ALL the swirls and not just cover them up.

Now follow with Klasse Glaze... which is in a gray bottle. SO SIMPLE to use... but most effective in getting your best shine on your black paint. With another pad, you simply wipe a little of the glaze over your paint and here with your hand, you apply NO pressure... because this is not a polish... it is simply a glaze that enhances your clear coat by filling in all the pores and microscopic caverns that effect how light is reflected off your paint.

Note: Many detailers including myself, recommend using a Spray Detailer that you use between washes to remove light dust. Mist the pads you use BEFORE applying the Polish and doing your vehicle and the Glaze before doing the vehicle... this allows the pad to more evenly distribute the product and not use it over excessively like we tend to do!

Here is the trick of your shine... If you want the best shine possible, the LONGER you leave the glaze on, the better the effect will take place. Amazing huh? Well, this is a process that we are going for a KILLER WET shine visual here. But the minimum also is 1 hour after it is on... so choose what you like... then buff it off.

With Klasse Glaze, it is possible to use several coats after to continue to enhance the shine... and this is not a phrase made up... this is actually very true.... if you buffed the glaze after an hour, then you have to WAIT 4 hours for the glaze to cure before applying another coat. If you waited over night and buffed the glaze in the morning, then you can buff off the glaze and then immediately reapply another coat of glaze.

Above is the best piece of advice from how people get their vehicles at shows to look SO rich.

The glaze is your best tool. Remember, the more coats, the better the effect but remember the times in-between to making it work. In addition, Klasse Glaze can be applied to all the taillights, headlights, foglights as well... just make sure you rub it off after its left on for a little.

Now dont mistake me here... because many will read through this and think. DAMN... thats a lot of work! Well, not when you do it right the first time. This is a method that will allow you to keep the shine for up to 10 to 12 months typically... and can go longer if you glaze your vehicle every 2 weeks or so.

Now... after the glazing...

Use a good wax... Meguairs is recommended again.

This seals in your perfection... and if you wash your vehicle ONCE a week, which is recommended, follow with a wax.

Again, USE MICROFIBER towels and pads... they are the best and you will love how these towels suck up the white dust left from chemicals and wax.

You can use a Spray detailer like Eagle One or Black Magic to keep the dust off during the week and take off with a clean microfiber towel (keep a bottle and a few towels in your vehicle).

And always, if you have the time. GLAZE your ride every 2 weeks or 4 weeks and follow with a wax.

AND ABOVE ALL - NEVER use dirty towels or cheap terrycloth towels on DARK PAINT!

Then after following all this, you will NOT have swirls and your BLACK paint will be ultra buttery smooth and wet for the 10-12 months I said at which time you will need to REPEAT from the top.

Now... all of you who read this... it works best on RED also... or any DARK Color. All other colors will benefit as well... enjoy a swirl free buttery smooth wet world!
Read more →

Audi A3 DIY Stealth Valentine One V1 Concealed Display Hardwire Install BWW

,
Heres my version of the V1 Stealth Hardwire.

1. Remove rear view mirror and notch out black portion.

2. Run wire in the headliner and down the pillar. Ziptie for good measure.

3. Run wire from fuse box area to drivers DIS. I removed the vent to make it easier.

4. Wire V1 to fuse box.

5. Notch out cover.

6. Rewire concealed display to have the phone jack coming out the back.

7. Reinstall and clean up. Happy motoring.

Read more →

Audi A3 Hexomat Cargo Liner

,
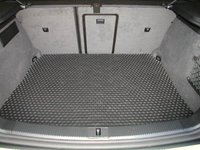
Got my Hexomat cargo liner today!

Heres the cargo mat situation for the A3 Sportbacks in the US: In Europe, there is apparently a structural difference in the rear cargo area floorpan between the front-wheel-drive and Quattro versions of the A3 Sportback. In the US, all of our A3s (Quattro or FWD) have the same cargo area shape and floorpan as the Quattro models do in Europe. So, when Audi originally brought in cargo area liners, they were the wrong ones and didnt fit properly. (This seems to have been corrected now - the original (wrong) part number ended with 180, the new (correct) part number should end with 181.)

While this was being straightened out, I looked around for other options. One concern with a liner that has a lip around the edge to trap spills is that the lip obstructs the cargo net attachment hooks. Ive been happy with Weathertech products in the past, but they dont make a cargo liner for the A3 yet.

What I did find was the Hexomat products from AutoSportCatalog.com They have both floormats and cargo liners in black, grey and tan. I was afraid that they had made the same mistake that Audi did, but they were nice enough to send me paper templates of the mats to check sizing before I ordered. The templates were the correct shape, so I ordered a cargo liner. I did not order floormats because they are exactly the same shape as the original carpeted mats that came with the car. This may appeal to some people, but I think that the drivers mat is too short and needs to reach up beind the pedals to trap the maximum amount of dirt, and the passengers mat really needs to cover the wheel well (the Audi Euro rubber mats do exactly that, which is what Im going to get for the floormats).

The Hexomat products have deep dimples over the whole surface of the mat instead of a lip around the edge. The advantage of this is that spills are more likely to be trapped near where they occur rather than spreading around the whole mat.

The Hexomat cargo liner arrived today. Im happy with it. It needed to settle a bit to flatten out after being rolled up in the shipping box, but I helped it out by rolling it the opposite way for a bit. It also didnt fit exactly right in a couple of spots, but removing about a millimetre of rubber with a razor blade solved that, and Im making the company aware of what they need to do. Its a very heavy grade material, and seems like it will be even more durable than my old Weathertech one was.

Black is definitely the right colour - I think the grey is a bit too milky to match well with the rest of the cargo area.


Read more →

Audi A3 A3 air shifter front door trim mod

,
Well, the door trim is cake; but the shifter was a bit more challenging than I thought it would be. Just take it slow. youll see, I only did the knob, but the boot/knob will be no more difficult. youll need a pair of needle nose pliers, a zip tie, or, whatever.
Heres the before trim....6 scratches :-)

Photobucket - Video and Image Hosting


just get your fingers under there, and pull towards you evenly from L to R, then theres a clip that slides from R to left.
Photobucket - Video and Image Hosting


Off
Photobucket - Video and Image Hosting


Oh what a difference
Photobucket - Video and Image Hosting


You likey?
Photobucket - Video and Image Hosting


Photobucket - Video and Image Hosting


Ok, are you ready?
Photobucket - Video and Image Hosting


Pull that button out, very easy.
Photobucket - Video and Image Hosting


then, slide a zip tie up and under the button, theres a notch, get it in there and pull it secure. this is important.
Photobucket - Video and Image Hosting


OK, then open the ashtray, and from the rear of the shifter trim plate, slip your fingers under there and pull up...up it comes, now pull that sucka up over the knob...twist and turn a little to get it past.
Photobucket - Video and Image Hosting


OK, now get a flathead in that devil clamp and twist like Chubby Checker.
Photobucket - Video and Image Hosting


Hey!
Photobucket - Video and Image Hosting


Can you pull up?
Photobucket - Video and Image Hosting


No, you cant; and heres why.....
Photobucket - Video and Image Hosting


the end of the shifter knob, has 4 little notches that hold it onto the ring that the boot is attached to....
Photobucket - Video and Image Hosting


Youll need to push the end together so the shaft of the knob can pass thru that ring ....then pull up as you do that....take it easy.....
Photobucket - Video and Image Hosting


then I used a super duper zip tie to secure, the width was identical to the width of the channel where the clamp was...I trimmed it down a little more, it was biting into the boot
Photobucket - Video and Image Hosting


And now, ladies and pic whores........
Photobucket - Video and Image Hosting


Photobucket - Video and Image Hosting


Photobucket - Video and Image Hosting


Photobucket - Video and Image Hosting


Photobucket - Video and Image Hosting


Photobucket - Video and Image Hosting


Photobucket - Video and Image Hosting
Read more →