Saturday, March 30, 2013
Volvo Operator’s Manual VNL and VNM PDF manuals

This manual contains information concerning the safe operation of your vehicle. It is extremely important that this information is read and understood before the vehicle is operated. This manual also contains a considerable amount of information concerning the vehicle, such as vehicle identification, Preventive Maintenance recommendations and a log for your service records. Please keep this in the vehicle at all times. Information from other component manufacturers is supplied in separate manuals in the Owner’s Package.
modifications to Vehicle
Chassis Frame
Frame side rails are heat treated. No welding is permitted because structural failure may result. Do not drill through either top or bottom flanges. A warning label is also attached to the frame for information. Drilling is permitted in the frame web in accordance with a specified hole spacing pattern. Consult a Volvo Truck dealer to obtain approved hole spacing dimensions or refer to the Frame Rail and Cross Member Service Manual. Frame rail and cross member nuts and bolts should be checked periodically and tightened to the specified torque if necessary.
Frame Alterations
Under no circumstances can the frame be cut and an extension piece added to increase the wheelbase. The only alteration allowed is wheel base shortening, where the only change in the frame rail is a new hole pattern drilled for the new location of the rear suspension.
Front Recovery Capstan Winch Kit Part No GLR 101 for Land Rover

1. Discard front apron panel. mark and drill one hole.
2. Position riv-nut in crossmember and expand.
3. Fit support plate with one bolt. Mark and drill remaining 9 holes.4. Fit 4 other riv-nuts to crossmember.
5. From beneath the vehicle cut out radiator cowl.
6. Fit new starter dog to engine.
7. Secure support plate and rope guide brackets to bumber and crossmember. Fit Winch to support plate.
8. Apply grease, insert spring aseemble drive shaft and engage with crank dog.
9. Align selector fork and brackets. Mark and drill 2 holes. Position and expand riv-nuts. Secure Brackets.
10. Assemble selector lever and Pivot. Secure to support plate.
Friday, March 29, 2013
Volvo Service Manual Lubricants Fluids

Short Description
The development of modern hydraulic equipment etc. has imposed greater demands on the quality of hydraulic oils. Experience gained from the Scandinavian markets concerning hydraulic oil characteristics when operating at low temperatures has been of benefit, particularly where it applies to hydraulic operated components such as bogie lifts, tippers, cranes, cab tilting cylinders etc.
Because of the above mentioned experiences, today’s hydraulic oils as a rule contain polymers. The most notable aspect of these hydraulic oils, when compared to those oils without polymer additives, is that their temperature - viscosity dependance is less. In general thse hydraulic oils have better characteristics at low temperatures, the chief characteristic being pumpability. This must be sufficiently good that when starting and warming up of hyraulic components, abnormal wear and risk for breakdown is avoided. Listed below are some of the requirements necessary for a good quality hydraulic oil.
BMW Engine Oils Service Information bulletin
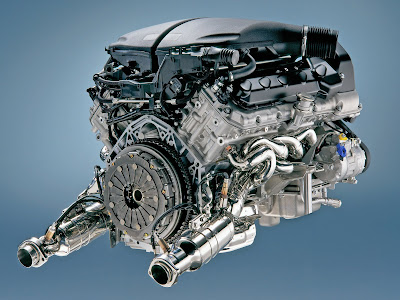
Short Description
Starting with the introduction of the 1999 3 Series (E46), BMW introduced an extended oil change interval of approximately 15,000 miles depending on engine operating conditions. The engine oil change interval of approximately 15,000 miles has been carried over to all 2001 BMW models. However, engine oil should be changed at least once a year. This revision (annual oil change) is retroactive to earlier model years and is included in the BMW Maintenance Plan. To coincide with the increased oil change interval, BMW also introduced “BMW High Performance Synthetic Oil” SAE 5W-30.
BMW recommends the use of BMW High Performance Synthetic Oil SAE 5W-30 or Castrol RS SAE 10W-60 Synthetic Oil also called Castrol TWS Motorsport SAE 10W-60 Synthetic Oil on all models as outlined below whenever a service is necessary to avoid engine damage.
Synthetic Engine Oil Benefits
BMW High Performance Synthetic Oil SAE 5W-30 and Castrol RS SAE 10W-60 Synthetic Oil also called Castrol TWS Motorsport SAE 10W-60 Synthetic Oil offers several benefits over conventional mineral based oils.
These oils have been durability tested on BMW engines and supply superior lubrication under all operating conditions and over the extended BMW oil change intervals.
– Superior thermal stability
The synthetic based oil resists thickening at very low ambient temperatures providing improved flow, lubrication and less internal engine resistance during cold starts.
Under high heat conditions, the oil resists thermal breakdown/shearing which causes a loss of lubrication quality with conventional oils.
Using BMW High Performance Synthetic Oil eliminates the need for seasonal oil changes since it covers all ambient temperature ranges.
2004 Nissan Xterra Owner Guide Repair Manuals

Short Description
Welcome to the growing family of new NISSAN owners. This vehicle is delivered to you with confidence. It was produced using the latest techniques and strict quality control. This manual was prepared to help you understand the operation and maintenance of your vehicle so that you may enjoy many miles (kilometers) of driving pleasure. Please read through this manual before operating your vehicle.
Your new NISSAN is the result of our dedication to produce the finest in safe, reliable and economical transportation. Your vehicle is the product of a successful worldwide company that manufactures cars and trucks in over 17 countries and distributes them in 170 nations. NISSAN vehicles are designed and manufactured by Nissan Motor Co., Ltd. which was founded in Tokyo, Japan in 1933, and NISSAN affiliates worldwide, collectively growing to become the fifth largest automaker in the world. In addition to cars and trucks, NISSAN also makes forklift trucks, marine engines, boats and other diversified products.
…
Reclining
To recline the seatback, pull the lever up and lean back. To bring the seatback forward, pull the lever up and lean your body forward. Release the lever to lock the seatback in position. The reclining feature allows adjustment of the seatback for occupants of different sizes for added comfort and to help obtain proper seat belt fit (see “Precautions on seat belt usage” later in this section). Also, the seatback can be reclined to allow occupants to rest when the vehicle is stopped.
Thursday, March 28, 2013
Audi Heating and ventilation system servicing Manual
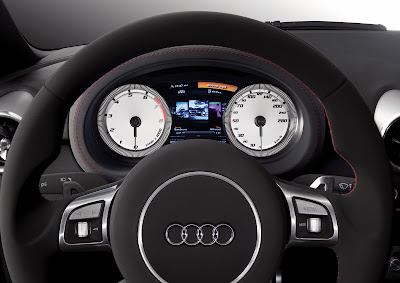
Before working on the electrical system: Note: Air is extracted from the passenger compartment through 2 outlets located on both sides of the rear luggage compartment area near the bumper page 87-157 . Removing and installing Repair Manual, Body Interior, Repair Group 70 Obtain security code for anti-theft radio. Note customer’s pre-set radio stations. Disconnect battery Ground (GND) strap.
…1 - Instrument panel top cover
2 - Retaining spring for air guide duct Page 1of 24Heating and ventilation system, servicing
3 - Retaining spring for air guide duct
4 - Air guide duct
5 - Defroster duct
6 - Right instrument panel air outlet
7 - Side window defroster vent
8 - Center instrument panel air outlet
USASPEC PA11 FORD1 FORD iPod INTERFACE OWNERS MANUAL

Short Description
The PA11-FORD1 just got better. The interface connects the iPod or iPod mini directly to Ford Motors audio system and its on-board software translates commands from either your Ford CD Changer controls into commands that the iPod understands. This interface enables the iPod to take place of a Ford remotely mounted CD Changer and provides the following benefits:
Website: www.discountcarstereo.com | Filesize: 316kb
No of Page(s): 6
Content
1. Direct connection of the iPod to Ford vehicle audio system for optimum sound quality
2. Control iPod playback with CD Changer buttons on car radio
3. Direct access and control of up to 5 favorite playlist and/or direct control of the iPod using the iPod buttons.
4. Charge the iPod internal battery — and charging stops automatically at one hour after iPod is paused.
5. Auxiliary audio input [connect additional audio device (SAT radio, DVD Player, Game system etc) and listed to it on the factory system)
6. Plug-n-play: includes installation cable, mounting screws and owner’s manual.
…
Get the file Download here
2013 Nissan Frontier Owners Manual
A Desert Runner model is new on the 2013 Nissan Frontier; offered only with rear-wheel drive & the automatic transmission, it includes 16-inch Off-Road alloys, Bilstein off-road shocks, fog lamps, a special chair upholstery, embroidered logos, decals, & badging. this is the picture of 2013 Nissan Frontier:

There is as well as a new Value Truck Package, adding Dual Zone climate control, the RearView Monitor, rear sonar method, a sliding bed extender, fog lamps, a trailer hitch, spray-in bedliner, & Utili-track tie-downs. The gains arrive thanks to reduced engine friction & improved aerodynamics. Most notably, a seal has been added between the cab & bed, while spoilers at the front & at the tailgate help smooth airflow.
& if those features are not , perhaps of the sharp new colors will grab you. Glacier White, Graphite Blue, & Cayenne Red have been added as new exterior hues for 2013. See our full review of the 2013 Nissan Frontier lineup for more details, specifications, pricing, & pircutres. The 2013 Frontier for the U.S. will be built in Canton, Mississippi & Decherd, Tennessee. thank you, you can read "2013 Mazda CX-5 Owners Manual" too.
Download here 2013 Nissan Frontier Owners Manual
Wednesday, March 27, 2013
Boeing 737 Standardized Procedures
Download: Boeing 737 Standardized Procedures
The Boeing 737 Technical manual Guide
Download: The Boeing 737 Technical manual Guide
get Kia Rio Cinco Owner Manual
Download: Kia Rio Cinco Owner Manual
ALFA ROMEO MONTREAL ELECTRONIC IGNITION CONTROL UNIT WIRING DIAGRAM
Download: ALFA ROMEO MONTREAL ELECTRONIC IGNITION CONTROL UNIT WIRING DIAGRAM
2013 Mazda MX 5 Owners Manual

2013 Mazda MX-5 has three types, namely the 2013 MX-5 SPORT CLUB 2013 MX-5, and 2013 MX-5 GRAND TOURING at a price that is also different from each other. The following pricing details for the three types.
- 2013 MX-5 SPORT - $ 23.720
- 2013 MX-5 CLUB - $ 26.705
- 2013 MX-5 GRAND TOURING - $ 27.350
This car has an amazing design, and is suitable for those who have a high style, as it can also be used for roads and cars family cars. Comfort and safety are also not inferior to other cars.
Enough here before our encounter today, see also "2013 Mazda CX-5 Owners Manual" before leaving this blog. thank you
Download here 2013 Mazda MX-5 Owners Manual
Tuesday, March 26, 2013
2006 and up Honda Civic Si TWM Performance Shift Boot Installation Manual
Download: 2006 and up Honda Civic Si TWM Performance Shift Boot Installation Manual
Volvo Marine Engine Penta MD11C D MD17C D Workshop Manual
Download: Volvo Marine Engine Penta MD11C, D, MD17C, D Workshop Manual
2008 Alfa Romeo Brera Brochure
Boeing 787 Airport Compatibility Brochure
Download: Boeing 787 Airport Compatibility Brochure
Audi RS4 Quick Owners Manual reference guide
Download: Audi RS4 Quick Owners Manual reference guide
Monday, March 25, 2013
Toyota Tacoma Technical Service Bulletin Front Cowl Water Leak Repair Procedure

Short Description
Use the following field–fix procedure if water is present on the floor carpeting and it can be confirmed that the leak is from the front cowl seam.
Website: www.customtacos.com | Filesize: 55kb
No of Page(s): 4
Content
Toyota Glass Cleaner has been added to Required Tools & Materials. Steps 2 and step 3 have been updated in the confirmation procedures for the front cowl seam leak and the lower front cowl seam leak (step 2: Toyota Glass Cleaner added, step 3: air intake selector should be set to Fresh instead of Recirculate).
…
1. Remove wiper arms and plastic cowl cover. For further removal instructions, refer to the Technical Information System (TIS): 2005 model year Tacoma Repair Manual: Wiper & Washer: Windshield Wiper Motor Assy: Replacement.
2. Locate the left and right front cowl seam and wet area with Toyota Glass Cleaner. Refer to Figure 1 for the location of the left front cowl seam.
2000 2003 Honda S2000 Service Manual

It will cover everything from oil changes to rebuilding the transmission. The simple fluid changes that you pay hundreds for are covered as well as any repair you can think of. This manual has detailed illustrations as well as step by step instructions. You will now be able to do the repairs and services that you pay hundreds for yourself. This manual is just like a paper manual on a disk. It covers the vehicle inside and out. From interior to exterior. Learn how to find whats wrong, what you need to fix it and how with this manual.
Download: 2000-2003 Honda S2000 Service Manual
Dodge Magnum 5 2 5 9 V8 2bbl MPI Direct Replacement Intake Manifold Repair Manual
1. Disconnect the negative battery cable.
2. Drain the coolant from the radiator.
3. Remove the air cleaner and ducting assembly.
4. Loosen the fan felt.
5. Disconnect all vacuum lines and wiring to the injectors, sensors, and throttle body.
6. Remove throttle linkage and throttle body assembly.
7. Remove the whole fuel rail w/ the injectors still attached. Do not remove the injectors from the fuel rail or disconnect the fuel lines since they are under high pressure. Be sure that you do not lose the o-rings from the injectors (they may get stuck in the old intake manifold). Replace any damaged or worn o-rings. Move the whole assembly out of the way so that you can remove the intake manifold (while leaving the lines still attached). Important: If you must remove the fuel lines be sure to release the fuel pressure in the system (please see the service manual for the procedure for your vehicle).
Download: Dodge Magnum 5.2/5.9 V8 2bbl MPI Direct Replacement Intake Manifold Repair Manual
BMW E65 66 Interface Install Manual
Download: BMW E65/66 Interface Install Manual
2004 Mercedes Benz c230k c320 C Class coupé Operator’s Manual
Your selection of our product is a demonstration of your trust in our company name. Further, it exemplifies your desire to own an automobile that will be as easy as possible to operate and provide years of service. Your Mercedes-Benz represents the efforts of many skilled engineers and craftsmen. To ensure your pleasure of ownership, and for your safety and that of your passengers, we ask you to make a small investment of your time: • Please read this manual carefully before putting it aside. Then return it to your vehicle where it will be handy for your reference. • Please abide by the recommendations contained in this manual. They are designed to acquaint you with the operation of your Mercedes-Benz. • Please abide by the warnings and cautions contained in this manual. They are designed to help improve the safety
of the vehicle operator and occupants. We extend our best wishes for many miles of safe, pleasurable driving.We recommend using Mercedes-Benz original parts as well as conversion parts and accessories explicitly approved by us for your vehicle model. We have tested these parts to determine their reliability, safety and their special suitability for Mercedes-Benz vehicles. Click here to get 2004 Mercedes Benz c230k,c320 C-Class coupé Operator’s Manual
Sunday, March 24, 2013
Car Voltmeter Installing in Peugeot 308

But the big question is rather how do you use a voltmeter. Examine the gauge or readout on your voltmeter. After some checking and so forth here is how you should use it:
Although a battery is called a 12 volt battery, its voltage varies from about 12.6 volts down to
10 volts when it is discharging and can rise to 15 or 16 volts during charging. It is very
important, however, to limit the maximum battery voltage during charging otherwise the
battery will be damaged. The battery voltage should not exceed 13.8 volts for long periods
and 14.4 volts for short periods (8 hours maximum).
With the engine running and your alternator working correctly, you should see a reading of approximately 13.3-13.5 volts. Although the voltmeter cannot directly tell you good or bad battery however it provides you a monitoring on how your alternator is working and if you see anything less than 13.3v for a long time or constantly dropping - it is a tell tale sign that you should get your battery checked. So far during long drive, I will see the voltage going up to 13.6v meaning the alternator is doing its job.
 |
| In my hand, it is as big as this |
 |
| Compared to the Peugeot 308s key |
 |
| Fixed it in just beside the headlight height adjuster. |
 |
| It looked something like this as a whole |
 |
| What it looks like from the rear. Not bad eh! |
Air Intake Open Pod on Peugeot 308
 |
| Err .. i did not bought this .. merely to beautify my webpage. |
Warranty is out, so the world is your oyster. One of the wanted things i longing to do was the air intake. Been living with the K&N drop in for 3 years now .. so its time to rip it out since warranty is out. Went to the BM 99 shop, look around and found the biggest mushroom i can find ... actually wanted to pay when i found that i dont have enough cash .. oh well plastic money will do...
Before start, i have to rip off the old organs .. yup .. the K&N drop in filter, the Resonator box and the divider .. definitely to section out for cold air.
 |
| Vital Organs |
 |
| Bright blue mushroom, wire mesh. Taken the place for the resonator. Tied it around the hook of resonator as well. |
A quick initial test drive ...reveals ... whoah .... you can literally fly ... muahaha ... nope. It is not that drastic but will certainly give you some grin. First off it is more free revving. It is like the Pug got its nose picked clean. You can literally rev your nuts off .. as i still use the original piping .. hence you get more roar but it is not ear deafening at all ..just slightly more than original. Other than that i dun find anything else negative and it is definitely here to stay. Since no more warranty .. i will just bring in to service with the mushroom on ...